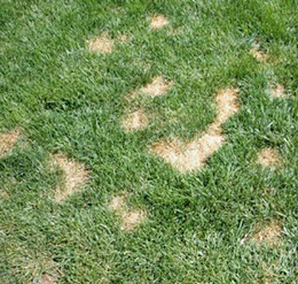
 A lawn can go from lush to lousy with just a few, or even a single, bare patch. Bare spots in your lawn can be the result of draught, chemical burn (including pet urine), disease, soil compaction (usually caused by heavy foot traffic), and weed or insect infestation.
If the cause is heavy foot traffic, try to find a solution to minimize this traffic in the area. Perhaps you can install stepping stones or a gravel pathway to reroute traffic and protect your grass. If the turf has been damaged by pet urine, it will resemble a patch of straw in the center with a dark green ring around the outside. The urine acts much like a fertilizer burn. Ohio State University scientists recommend watering the area to dilute the concentration of urine. If you are able to keep the pet off the lawn, the grass can be reseeded. If insects or disease are the cause, investigate to determine the specific critters or disease to treat. Most treatment products require significant time after application to work before you can grow new grass. Information on the treatment product packaging will tell you how long to wait before sowing new grass seed. The good news is that bare spots can be repaired pretty easily. Here’s how: 1. Using a garden fork, dig up the area roughly 4 - 6" deep, breaking up any clumps. (If the problem was caused by a spilled chemical such as gasoline or an herbicide, remove several inches of surface soil.) 2. Mix in topsoil to enhance the soil quality and help the new grass seed receive better nutrients for a healthy start. 3. Cast a thin layer of seeds on the area, and then gently rake the seeds into the topsoil. Cover it with straw or burlap to hold in moisture and protect the seeds from birds. 4. Using a fine spray from a hose, keep the soil moist, but not drenched. Water the seeds in the early morning and evening every day to prevent the soil from drying out. This allows the roots from the grass seed to enter the soil. Once they start to sprout, water the lawn every day. 5. Once the grass is established and growing well, fertilize it with a general lawn fertilizer and begin mowing the patch with the rest of the lawn. If your lawn seems thin all over, try overseeding. You can follow the same, basic instructions for patching. Rake the area well, picking up any leaves or other debris on your grass. Cast the seeds over the turf, and then spread about a half an inch of compost or topsoil on the lawn. To get good seed-to-soil contact, gently rake the seeds and soil into the grass. Water daily.
4 Comments
 Many people like to have trees on their property for a number of different reasons. Trees can add beauty to your landscape, cool shade in hot summer months, provide privacy, and add sense of longevity to your home, as trees are typically enjoyed for many generations. For a tree to reach full maturity and last this long, it must have a healthy start with extra care taken at planting. If you’re going to plant a tree on your property, here’s a bit of advice to help you.
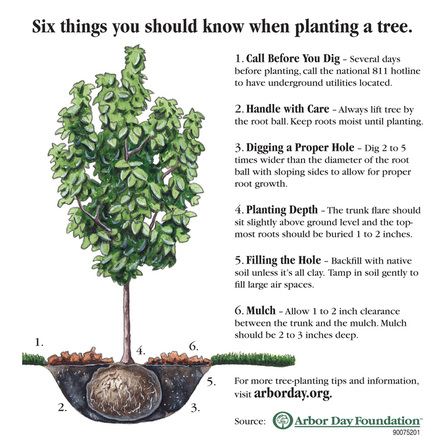
1. Select the area where you want to plant your tree. Depending on the type of tree and how large it can get at full growth, make sure this planting spot is 15 - 20 feet away from your house, street, driveway, utility poles and power lines and any other structures. Insert a white stake or flag into the ground at this spot. Call Dig Safe at 811 to ensure safety and get approval to dig in the spot you've selected. It's the law in Massachusetts! Get more information HERE. 2. Stand the tree upright and untie the burlap from around the base of the trunk, but not beyond the top of the root ball at this point. Use a garden trowel to carefully remove the soil from the top of the root ball. Remove just enough soil to expose where the trunk starts to spread out into the individual roots (this is the root flare). 3. Measure the height of the root ball and subtract 2 inches from this. Dig your planting hole to this depth. DO NOT go deeper than this measurement, as a hole too deep will bury the root flare and prevent your tree from taking root and growing successfully. Dig your hole 2 – 5 times wider than the size of the root ball as well to allow roots to spread once planted. If you’re shoveling through grass, discard any removed grass and avoid using it to back-fill your hole. 4. Accurately measure the depth of your hole and once you reach the appropriate depth, scrape the bottom of this hole so that it's flat. You can sprinkle some superphosphate around this flat bottom of your hole which will help promote healthy roots (refer to the packaging for how much to use for your size/type of tree). 5. Carefully carry or roll your tree into the hole. Take a step back and view your tree as another person slowly rotates it. Ensure that the trunk of the tree is straight and look for the nicest side of the tree to face in the most prominent direction where it can be seen. Carefully remove the wire, twine and/or burlap from the root ball. If some burlap is hard to reach at the bottom of the root ball, you can leave it there. Loosen the soil around the root ball to expose the many tiny roots. 6. Add superphosphate and fertilizer onto the pile of native soil you shoveled out (be sure to use the amounts recommended for your size and type of tree). Mix up the soil, then start backfilling your hole and avoid burying the root flare. Once the hole is full, use the blade of your shovel to create a 4-8-inch curb around the tree, making somewhat of a crater that your tree is in. Use a garden hose to fill this crater with water. As the water is absorbed into the soil, push in your curbing to fill the crater and smooth out the soil. 7. Spread 3 inches of bark mulch over the exposed dirt around the tree, but keep it away from the trunk of the tree (this could retain excessive moisture and encourage rot). Water the tree every day for at least six weeks. Good luck with your tree planting! If you'd like assistance in selecting or planting trees on your property, feel free to call us at Gardenin' Angels for professional help. |
Archives
February 2024
AuthorRodrigo Dos Anjos Categories
All
|
 RSS Feed
Gardenin' Angels, Landscape Management & Construction
A preferred landscaper, serving Southeastern Massachusetts
11 Renker Drive, Easton, MA 02375
774-284-1171
[email protected]
Privacy Policy • Terms of Use